This easy Sushi Rice recipe is fluffy, tender, and perfectly seasoned! Japanese short-grain rice is steamed on the stovetop and combined with rice vinegar, salt, and sugar for rice that is full of flavor. Use it for making sushi at home, poke bowls, and so much more!
A few days back we shared our favorite sushi bowls and the best way to make those is with this sushi rice.
For a long time, I was intimidated by making sushi rice and opted to use plain rice with a splash of rice vinegar instead. Until I finally set out to learn to make it at home.
Know what? It's actually super easy and it makes such a difference when you make homemade sushi rolls, onigiri, or nigiri at home.

What is sushi rice?
Sushi rice is a type of cooked Japanese short-grain rice, which is then seasoned with rice vinegar, salt, and sugar. Sometimes, kombu (kelp) is added to impart umami flavors.
Many short-grain rice varieties are labeled as sushi rice outside of Japan, which is misleading and somewhat confusing. Plain steamed Japanese short-grain rice is included in a variety of dishes besides sushi. It is actually the seasoning that differentiates steamed rice from sushi rice.
Once cooked, sushi rice is sour, sweet, and salty. It makes a flavor-packed base for dishes like Salmon Sushi Stacks, Shrimp Sushi Bowls, or Spicy Tuna Bowls.
Why you’ll Love Sushi Rice
- Easy: No more soggy or mushy sushi rice mishaps. Follow our step-by-step instructions for a fool-proof way to make it at home!
- Flavorful: You can taste the tangy, sweet, salty, and savory elements in every bite. It’s a great way to add flavor to your favorite dishes.
- Versatile: Use it for maki or uramaki, or poke bowls. There are so many creative ways to use sushi rice.
Ingredients and Substitutions
Here is everything you need to make this sushi rice.
- Japanese short-grain rice: Also known as sushi rice in places outside of Japan. You do not want long-grain rice varieties like basmati or jasmine since they won’t properly stick together.
- Rice vinegar: Make sure your rice vinegar is “unseasoned.” You will be making your own seasoning! Experiment with different brands as they all vary in terms of acidity and flavor.
- Sugar: Balances the tanginess of the rice vinegar. Just use regular granulated sugar.
- Sea salt: Enhances the flavor of the rice. I prefer sea salt, but table salt works as well.

How to Make Sushi Rice
Many people describe cooking rice as an art because it can be difficult. Different types of rice need different cooking times, methods, and amounts of liquid. Follow these steps for perfect sushi rice every time.
1. Rinse the rice
Rinsing rice for sushi is extremely important! It helps to remove excess starch, creating a separated and fluffy texture. Not rinsing the rice will result in a gummy, overly sticky texture.
Add it to a fine-mesh stranger, and rinse it under cold water until it runs clear. Once the water is clear, make sure the rice is thoroughly drained. You want to get rid of any excess water or the texture will turn out mushy.
2. Bring it to a boil
Use a pot with a heavy bottom and a tight-fitting lid, and it should ideally be non-stick. The heavy bottom helps evenly distribute heat, preventing it from burning too quickly.
Bring the drained rice and water to a boil over medium-high. Don’t go too far as it needs to be watched closely. As soon as it starts to boil, turn the heat down so it is just simmering. This will prevent it from sticking and burning on the bottom before it’s done cooking.
3. Simmer the rice
Cook the rice until it has absorbed all of the liquid. Don’t be tempted to turn up the heat since rice needs a consistent, low, and moist heat to absorb liquid without first burning or drying out.
When you remove the pan from the burner, keep the lid on and let the rice steam for another 10 minutes. This is key to achieving a perfectly fluffy texture.
4. Mix the seasoning
As the rice cooks, make the seasoned rice vinegar. Combine the vinegar, sugar, and salt in a heat-safe bowl. It’s best to heat it up so the sugar and salt properly dissolve.
It’s important to use high-quality rice vinegar for the best flavor. You’re going for the perfect balance of sweet, sour, and salty.
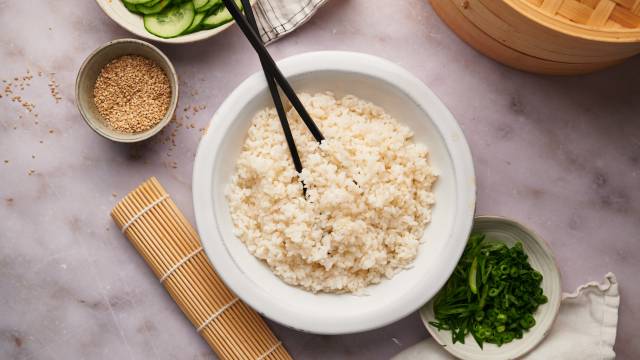
5. Assemble the sushi rice
Once the rice is fully cooked, transfer it to a baking sheet so it can cool quickly. Spread the rice out and drizzle the seasoned rice vinegar mixture over top.
Use a wooden spoon or spatula to combine the sushi rice and seasoned vinegar mixture. Remember to fold it gently as overmixing and smushing will lead to mushy, overly sticky rice. Make sure it is cooled completely before using it in recipes for the most ideal texture.

How to Use Sushi Rice
Once your sushi rice has cooled, try it in recipes like Crispy Asian Salmon Rice Bowls, Asian Rice Bowls, and Vegetarian Sushi Bowls.
You can also try making your own onigiri, maki rolls, or uramaki rolls filled with yam, cucumber, avocado, crab, or prawns.
Storage and Reheating
While it's best to make just enough sushi rice for what you’ll be using it in, here are some tips for storing leftovers:
- Fridge: Avoid refrigerating your rice as it will dry out and turn quite hard.
- Freezer: Transfer the rice to an airtight container, then cover it with a lid to keep the moisture in. Once it is cool, it can be frozen for up to 1-2 months.
- Reheating: You can reheat your rice by adding it to a container and placing a paper towel or cloth over it. Warm it in the microwave in 45-second increments until it’s hot and steamed. This will take about 2-3 minutes.
Variations
While sushi rice may seem straightforward, there are some fun ways to change up the flavor.
- Brown: For a healthier option, try making brown sushi rice with short-grain brown rice. Just note that brown rice will be less sticky, and it will require a longer cooking time.
- Wasabi: Add a few teaspoons of wasabi paste to your sushi rice for a spicy kick.
- Kombu: Cook the rice with a piece of kombu for a pop of umami flavor.
- Dashi: Mix in some dashi powder for ultra-savory flavors.
- Sushizu: If you don’t feel like seasoning the rice vinegar yourself, you can always purchase preseasoned rice vinegar. You’ll find it at the store labeled “sushizu.”

Tips for Making Sushi Rice
Follow these tips to make fluffy, tasty rice every time.
- Short-grain rice: Double-check that you have short-grain rice. It contains more starch and is much stickier than other types of rice. The additional starch component is what holds it together when preparing sushi.
- Rinse the rice: Rinse the rice until the liquid runs clear. This will drastically improve the overall texture once it’s cooked.
- Heavy pot: Use a heavy pot with a tight-fitting lid in order to keep the moisture and heat locked in. Without this, you run the risk of the rice drying out or burning.
- Measure correctly: To achieve consistent results, it’s crucial to accurately measure both the rice and water.
- Let the rice cool: If you’re making sushi rolls, let the rice cool to room temperature so it doesn’t become too sticky or fall apart.
from Slender Kitchen Blog and Recipes RSS Feed https://ift.tt/jKOWeoQ
Comments
Post a Comment